Another important utility within your Concrete5 site dashboard is the File Manager. The file manager allows you to upload photos, audio, videos, pdfs, basically any kind of file for use within your websites layout, or as a resource for your visitors to access or download.
Step 1. Access the File Manager
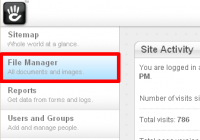
The main access to the File Manager can be found in the left column of your dashboard. This will allow you full access to all aspects of the Concrete5 file system. During normal operations, like adding an image to a page, you will also be brought to the file manager, just in a pop up window, so a lot of the information provided in this tutorial will be used when performing many Concrete5 functions.
Step 2. Familiarize yourself with the main view
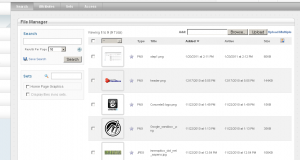
The inital view that appears will be where you perform most of your functions. It is broken up into three major functional areas. On the left side of the page you will see the “Search” and “Sets” functions. These will allow you to filter the files you see in File Listing area, which makes up the bulk of this window.
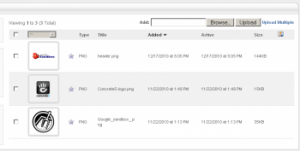
The file listing shows each of your files and presents some basic information about those files.
The last major area of the default File Manager view is the file upload functions up at the top right. These buttons will allow you to upload a file or multiple files from your local machine onto the website.
Step 3. Perform a Simple Search
The search area will allow you to find a file in two different ways. You can type in some text and click the search button, which will show you any files that contain your text in their file name, file description, or tags.
You can also have concrete5 search for files that match any of the following attributes:
- Size – How large or small the file is in kilobytes
- Type – What kind of file it is, image, video, etc
- Extension – What the file extensio is, .bmp, .jpg, .avi, etc
- Added Between – when the file was uploaded to the concrete5 website
- Added to Page – Find files that are displayed on a particular page of the website
- Other Custom File Attributes – Any other user defined file attributes, Concrete5 ships with width and height attributes that refer to an images dimesions
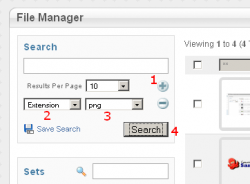
In order to perform an attribute search you must:
- Add the particular filter using the + icon on the right side of the search box.
- Select the Attribute you wish to search
- Enter or select the Attribute Criteria
- Initiaite the search
You can stack as many text, and attribute searches together as you wish. For particularly complex searches, you may choose to “Save Search“, which will create a new box in your file manager with your saved search presets.
Step 4. Filter files using Sets
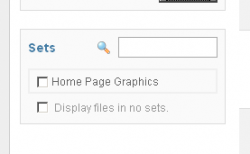
The other file filtering option is the use of file sets. File sets can be thought of as folders that hold similar files together. An important benefit of using sets instead of folders is that one file can belong to several different sets simultaneously.
The “Sets” box shows any file sets you have within your Concrete5 website. If you have a very large number of sets, you can use the Set search field to enter text from the sets title. Filter the file list by ticking the checkbox next to any file sets you want to display. All files not in any of the sets you select will be filtered out of the list.
Step 5. Working with the File List
The file list shows all matching files determined by the search box, and the set filter. The number of files shown at once is dictated by the “Results per Page” drop down box within the search box. After making a change here, you must click the “Search” button for it to take effect.
The default sort order of the files is by most recently uploaded. This can be switched by clicking on any of the column headings I describe below. Click a heading twice to get the files sorted in ascending order instead of descending order, denoted by the direction of the arrow.
- The far left column shows a thumbnail of the file. If the file is an image, it should be a standard image thumbnail. If the file is some other type of file, like a text document, pdf, or video, you will see a default icon that represents the file.
- The second column shows you the file type. Images can have several differnt file types like BMP, GIF, JPEG, and PNG. Typically, a file type is denoted in that files extension.
- The third column shows the file name.
- The fourth column shows you the timestamp of when the file was originally loaded into the Concrete5 File Manager. This is the default sorting order of your file listing.
- The fifth column shows then the “active” version of the file was uploaded. If you edit, or change any file uploaded into the file manager, the old version of the file will remain in the system, waiting for you to revert back to it if necessary. This is known as file versioning, and can be helpful if you ever want to turn back the clock on your website. The Active column shows you the time and date when you last updated the file.
- The last column shows you the size of the file you have uploaded in kilobytes.


Step 6. Uploading Files
Probably a function you will find yourself doing quite often, uploading files to your Concrete5 file manager can be done in a couple of different ways.
The top right of the file manager allows you to upload a single file by clicking on the “Browse” button. This will generate a operating system pop up which will allow you to select a file from your computer. After you find the file you want to upload click the “Upload” button to send it to your website.
If you have several files you need to upload, it will be more efficient to use the “Upload Multiple” link on the far right. After selecting this link, Concrete5 will render a pop up window, as seen in the second image for this step. Click the “Add Files” button on the right side, and your operating system will allow you to select files from your computer for upload.
On a windows machine, to select multiple files at once you have two choices:
- If the files are in a list, all right next to each other, click the first file once, then hold theShift key and click the last file. This will highlight all of the files in between .
- If you need to pick and choose different files within the list. Hold the Control Key and click individually on every file you want to upload.
Both of these methods only work if the files you are selecting are all within the Same Folder.
After you have selected your files, you can hit the “Start Uploads” button, which will upload all of the files sequentially.