This tutorial will show you how to update your existing Concrete5 slideshow with additional images.
Step 1. Find your new images
Pick out the images you want to add to your concrete5 slideshow. A good rule of thumb will be to get the largest images size you can in one of the following file formats. jpg, gif, png.
Jpg files are best for photographs.
Step 2. Login to your Concrete5 Website
Login to your Concrete5 website as an administrator with editing permissions.
Step 3. Access the slideshows edit window
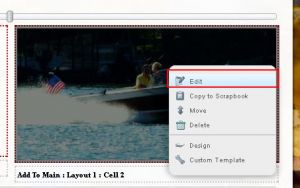
Navigate to the slideshow you want to update. Put the page into “Edit Mode” by clicking the edit button in the top left hand corner of the window. The slideshow should have a red dotted line around it. Left click within the box and select the “Edit” option in the resulting context menu.
Step 4. Determine the Slideshows source
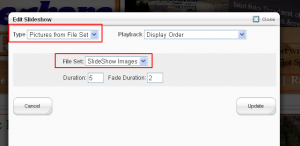
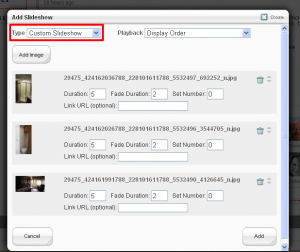
Your slideshow will have one of two sources which can be determined by examining the “Type” drop down box. If the “Type” is set to “Pictures from File Set”, then all the slideshow uses a file set as its source. If the “Type” is set to “Custom Slideshow”, then you will see where different images were manually selected to appear in the slideshow in this same window.
If the slideshow source is from a file set then take note of the “File Set” name which is also shown in this window. In the example, the file set is names “SlideShow Images”
Step 5. Upload your new images
Access the Concrete5 file manager and upload your new images.
- How to build a website with WordPress and what are the best plugins to use: WordPress Web Design Tutorials: How to build a website with WordPress and what are the best plugins to use. Building a website with WordPress is an excellent choice due to its versatility, ease of use, and a vast array of plugins that enhance functionality. Here’s a comprehensive guide to building a WordPress website, along with recommendations for the best plugins.
- The Most Important Stages and Plugins for WordPress Website Development: Developing a WordPress website requires careful planning, execution, and optimisation to ensure it is functional, user-friendly, and effective. The process can be broken into key stages, and each stage benefits from specific plugins to enhance functionality and performance. Here’s a detailed guide to the most important stages of WordPress website development and the essential plugins for each stage.
- What are the most powerful Tools for SEO in WordPress?: Powerful SEO Tools for WordPress: Search Engine Optimisation (SEO) is essential for improving your WordPress website’s visibility in search engines. Here are the most powerful tools to optimise your site effectively:
- How to add shipping modules in CubeCart: Step 1: Log in to Your CubeCart Admin Panel: Open your web browser and navigate to your CubeCart admin login page. Enter your username and password to log in.
Step 2: Navigate to the Extensions Section: Once logged in, go to the left-hand menu and click on Manage Extensions. From the dropdown, select Extensions.
Step 3: Find Shipping Modules: In the Extensions section, locate the Shipping tab to view available shipping modules. You can browse through the list or use the search function to find a specific module. - Gathering domain and IP information with Whois and Dig: In the digital age, understanding the intricacies of domain and IP information is essential for anyone navigating the online landscape. This article explores two powerful tools—WHOIS and DIG—that help gather valuable insights about websites and their underlying infrastructure. Whether you’re a cybersecurity professional, a web developer, or simply curious about online resources, you will learn how to effectively utilize these tools, interpret their outputs, and apply this knowledge to real-world scenarios.
- What are the best WordPress Security plugins and how to set them up the best way: Read a comprehensive guide on the best WordPress security plugins and how to set them up to ensure optimal protection for your WordPress site.
- Will a headland provide enough shelter?
- Learn How To Purchase Your Own Domain Name with Fastdot.com: Open your web browser and go to Fastdot.com. Navigate to the Domains section, either from the homepage or from the main navigation bar.
Step 2: Search for Your Desired Domain Name: In the domain search bar, type the domain name you want to purchase. Fastdot supports a wide range of domain extensions (TLDs), such as .com, .net, .org, .com.au, and many others. Click the Search Domain button. The system will check the availability of your desired domain name.
-
BEST Webhosting
Explore a comprehensive array of web hosting services designed to cater to various needs. Whether you’re an individual looking for reliable personal hosting or a business requiring high-performance solutions, BEST Webhosting offers tailored options to ensure optimal website performance, robust security, and 24/7 support.
-
Unveiling the Pillars of Web Hosting
Web hosting is the backbone of a digital presence, providing the infrastructure necessary to publish and maintain websites online. This article delves deep into the essentials of web hosting, guiding individuals and businesses to make informed decisions. Learn about hosting types, server performance, and scalability options to choose the perfect fit for your online goals.
-
Digital Experience and Coding a New Website
Building a website today involves more than creating an online presence; it’s about delivering an exceptional digital experience. This piece explores modern website design principles, user experience strategies, and advanced coding techniques. It highlights how a well-crafted website can effectively convey your brand message, captivate audiences, and drive business success.
-
How to Buy a .com.au Domain: A Buyer’s Guide to .com.au Domains
This guide is a must-read for startups and established businesses aiming to enhance their Australian online presence. Learn the steps to secure a .com.au domain that aligns perfectly with your brand identity. The article provides insights into domain registration requirements, tips for choosing a memorable domain name, and the benefits of a local domain for SEO.
- Incredible Ideas deserve Incredible DomainsWith Rapid Registration, your domain is registered almost instantly, meaning you don’t have to wait to get your business or name online!
-
Edge of Technology, Digital Transformation, and Cloud Computing
Staying competitive in today’s fast-paced digital landscape requires leveraging cutting-edge technologies. This article explores the vital roles of Digital Transformation (DT) and Cloud Computing in modern business strategies. Understand how these technologies drive efficiency, foster innovation, and enable organisations to scale operations seamlessly.
-
The Best WordPress Plugins for Email Marketing to Grow and Engage Your Subscriber List
Email marketing remains a powerful tool for audience engagement and lead conversion. Discover top WordPress plugins like Mailchimp, Constant Contact, OptinMonster, and Thrive Leads. This article provides detailed guidance on creating effective opt-in forms, segmenting email lists, automating campaigns, and tracking metrics for successful email marketing strategies.
-
The Best WordPress Caching Plugins to Optimize Site Speed and Performance
Website speed and performance are crucial for user experience and SEO rankings. This detailed review covers the most effective WordPress caching plugins, including W3 Total Cache, WP Super Cache, WP Rocket, WP Fastest Cache, and LiteSpeed Cache. Learn how these plugins enhance site performance by minimising load times and optimising server resources.
Step 6. Edit your images as required
For many slideshows it is imperative that the new images you add to the slideshow be the exact size as the other images displayed. If this is the case with your slide show.
Step 7. Add your new image to the slideshow
Depending on if the slideshow is a “Custom Slideshow” where the user selects images from within the slideshow block editor, or if the slideshow is driven by a file set, as in our example, you can now begin the process of adding the image to the slideshow. If you are working with a custom slideshow, access the slideshow block like we did back in step 2-3, and click the “Add Image” button to assign your new image.
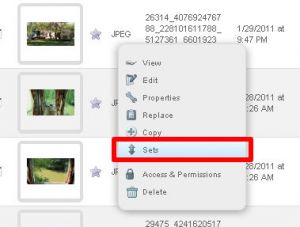
If the slideshow is driven by a file set, stay in the file manager and simply left click the image you want to add. Choose the “Sets” option of the resulting context menu, and then add the image to the appropriate set (as determined in step 4) by ticking the checkbox next to the sets name. Finally, click the “Update” button. Your new images will now be shown in the slideshow.